Thursday, March 31, 2011

banana cream pie recipe

Well, this was my breakfast this morning, along with 1 tylenol, 1 advil and a cup of coffee (woke up with a migraine).  I'm not proud of eating this calorie laden indulgent treat first thing in the morning, but boy was it delicious.

I had this sudden craving and urge to make a banana cream pie last night, got my recipe from www.allrecipes.com.  Had awesome reviews and was a pretty simple and quick recipe.  I used a store bought crust which made it a breeze to make.  Try it out if you love banana cream pie, also, it tastes even better the next morning after it gets a chance to chill overnight.  If your good at making your own crust I'm sure it will be even more delicious.  I don't do homemade pie crust...that's something I will never master.


the finished pie, haha you can see the shadow of my iphone on the pie


sliced bananas on the crust before the custard is added


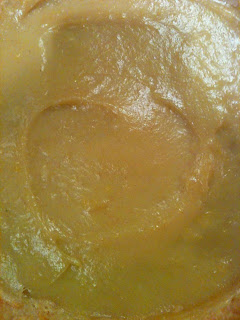
the yummy custard


Ingredients 

  • 3/4 cup white sugar

  • 1/3 cup all-purpose flour

  • 1/4 teaspoon salt

  • 2 cups milk

  • 3 egg yolks, beaten

  • 2 tablespoons butter

  • 1 1/4 teaspoons vanilla extract

  • 1 (9 inch) pie crust, baked

  • 4 bananas sliced

  • whipped cream


  • Directions
    1. In a saucepan, combine the sugar, flour, and salt. Add milk in gradually while stirring gently. Cook over medium heat, stirring constantly, until the mixture is bubbly. Keep stirring and cook for about 2 more minutes, and then remove from the burner.
    2. Stir a small quantity of the hot mixture into the beaten egg yolks, and immediately add egg yolk mixture to the rest of the hot mixture. Cook for 2 more minutes; remember to keep stirring. Remove the mixture from the stove, and add butter and vanilla. Stir until the whole thing has a smooth consistency.
    3. Slice bananas into the cooled baked pastry shell. Top with pudding mixture.
    4. Bake at 350 degrees F (175 degrees C) for 12 to 15 minutes. Chill for an hour.
    5. When chilled add your whipped cream and top with banana slices.  Chill again. 
    

    Monday, March 28, 2011

    bao bei chinese brasserie review

    I've been really wanting to try Bao Bei, a new chinese brasserie located in Chinatown, so my husband I went for our wedding anniversary last week.  Bao Bei is a hip new trendy tapas style chinese restaurant.  It's old style chinese decor with a bit of a Shanghai feel, dim lighting, great ambiance and nice bar, make it a great place to sample a variety of delicious tapas with a group of friends or with your date.  The food is authentic chinese, prepared with high quality ingredients, you could really taste the quality.  All the menu items range from $4 $6-$9 $10-13(meatier dishes) each so you get a great variety, the waitress told us the magic number is around 5 items among 2 people, it was just perfect we were full but I still had room for dessert of course. 

    We had the Mantou (steamed buns) with braised beef shortrib, hoisin, scallions, pickled cucumber, and roasted peanuts.  Hands down my favorite dish.  The little buns were really soft delicate, the beef was soo tender and delicious.  They were topped with hoisin sauce and pickled cucumber, and excellent combination of flavours.  I had only wished we ordered more, but didn't want to over eat.  Dish number two was the pearl bok choy with pork and black bean sauce, it was my second favorite.  The sauce was amazing.  My third favorite was the house special fried rice, the exotic mushrooms made it extra delicious. 
    Then we had the Shao Bing, which consisted of sesame flatbread with braised pork butt, Asian pear, pickled onion and mustard greens presented as a sandwich.  It was pretty good, but not my favorite dish, there was just a little something missing I felt.  We then had the Pork Pot Stickers, they were nice and juicy with good flavour.  Finally for dessert I had the Almond Panna Cotta with lemon gastrique.  The panna cotta was delicious and rich, the gastrique sauce was sweet and a bit sour but a bit too overpowering.  I would have much enjoyed the panna cotta on its own or with a nice rasberry coulis instead.

    Overall, I could taste the quality of the ingredients in the food.  The cocktails were very cool and yummy, apparently the owner used to bar tend at Chambar I believe).  I was happy with everything we ordered and can't wait to go back and order my favorites amongst the new items that I didn't order.  You'll love the food, the drink, the crowd and neat decor.

    mantou...my favorite dish, i will be back for several orders of these


    the house special fried rice was incredible, loved the mushrooms in particular


    the pearl bok choy with pork...soo yummy!!


    pork pot stickers


    shao bing


    lemon gastrique, confit kumquat, salted cinnamon almond brittle
    

    Sunday, March 27, 2011

    pretty wallpaper project...decor blog

    Wallpaper is hot right now, I love the new modern meets vintage designs out there, it's definitely not like your typical granny wallpaper of the past.  Here's an easy decor project that will give your room a great look without the commitment of wallpapering an entire wall.  We recently changed our minds about wallpapering Sophia's room as we will eventually sell our home and the pink peacock damask may not appeal to everyone.  So, rather than buying some artwork for her white walls, I decided to just mount the wallpaper that I fell in love with and had already ordered, in large inexpensive frames from Ikea.  It's a great way to create your own art.  Now I can still display her wallpaper, but in a more subtle way that isn't permanent.  I will be eventually wallpapering a feature wall in our master bedroom though,  using a design that is subtle and more appealing to the masses, so stay tuned for that.  Good wallpaper sites to browse are http://www.crownwallpaper.com/ and Graham and Brown as mentioned below.

    What you need:

    Wallpaper of your choice, I chose "Exotic" by Julien MacDonald that I ordered online from "Graham and Brown" http://www.grahambrown.com/

    Large frames, I went with white RIBBA frames from Ikea at $20 a piece.  You can go larger or smaller.

    Scissors, pencil, ruler and an adhesive to mount the wallpaper onto the back of the frame


    What to do:

    Very simple, measure align and cut your wallpaper to fit the frames BUT make sure you line up your wallpaper so that the next piece you cut is going to line up exactly with the previous and next one you cut after that, so that the images are all on the same level or the pattern continues when hung on a wall in frames side by side.  (Wow, I'm sure I could have shortened that explanation haha).  Then I just used the matting that comes with the frame behind the wallpaper to hold it in place in the frame without having to glue it down.  Assemble the frame and hang using a level.  Oh and make sure your wallpaper is actually wide enough to fill the frame, if you want to use very large frames just cut another piece of wallpaper and line it up side by side with the first piece on the backing of the same frame and spray down using an adhesive.


    the finished room, sort of I still have to add some decorative touches with the bedding etc. although i do like the clean, fresh, simple minimal look without much clutter


    your supplies
    

    Thursday, March 24, 2011

    holy streetfood pancakes!!!!

    Oh my god!!! I just had the best buttermilk pancakes yesterday morning while at work. They were melt in your mouth goodness with caramelized bananas, toasted walnuts, warm syrup and they were served piping hot straight from the streets!  My dear streetfood truck you've done it again!  These pancakes were EPIC (haha).  To be honest, they are soo good that I am going to drive to my office on my days off to get them when I'm in the mood for pancakes, and believe me, after eating these, I will be...and I'm not even a pancake person.


    street cakes as i like to call them
    

    Wednesday, March 23, 2011

    roaming dragon street food

    The food service provider that catered to my office and our surrounding offices has closed its doors recently, so we were left without convenient coffee treats and meals...until the “Roaming Dragon” came to town.  This food truck brings street food to a whole other level, it’s basically an asian fusion gourmet restaurant on wheels. 
    Yesterday morning I had “The Dude” breakfast burrito and it was scrumptious, a nice hot wrap filled with fluffy scrambled eggs, hashbrowns, extremely yummy thick slices of good quality bacon,  an asian bbq sauce and gooey melted cheese.  It was so filling and satisfying, I’m surprised I had room for another meal today (well not surprised).  I must say, this was probably the best breakfast burrito I have ever had.


    For lunch I ate a Korean shortrib taco, and a Chinese Pork Belly slider (small portions of each).   I enjoyed the shortrib taco but the meat was just a bit to saucy and over powering, the sautéed spinach, shitake mushrooms, carrots and kimchi dressing were nice, corn tortilla was okay but I don’t think it accompanied the Korean ingredients as well as a rice wrap would have.  The slider was pretty darn good, the braised pork belly was the best part, sauce was great.  The mantau, or Chinese steamed bun,  was a bit too bready and bunny for this dish in my opinion.  Overall though, it was still quite good.   To wash it all down,  I quite enjoyed the Lychee Basil Lemonade, very refreshing with just the perfect balance of flavours.

    Today I think I’ll try the buttermilk pancakes, with toasted walnuts and bananas.  I should watch how much I eat here, or I’ll become a  “roaming piglet”.


    the roaming dragon truck


    the "dude" breakfast burrito


    korean shortrib taco and pork belly slider


    lychee basil lemonade
    

    Sunday, March 20, 2011

    p.f. changs mongolian beef copycat recipe...delicious

    I love P.F. Changs!  Since you can only get it in the US, I thought I'd google some recipes of copycat versions of their dishes I enjoy, that I can make at home.  Came across a great recipe for their Mongolian Beef on http://www.food.com/.  With 5 star reviews, I knew it would be a winner.  Turned out awesome!!  I used a more tender cut of beef than the flank steak it calls for, which I think was a great choice.  Also, I got my butcher to cut the beef into strips for me to save me a bit of time.  There aren't any leftovers and I want more!  Hope to try another copycat recipe soon.  Try it, if you love P.F.Changs, you'll be glad you did, it's seriously super yummy. 

    Ingredients
      • 2 teaspoons vegetable oil
      • 1/2 teaspoon ginger, minced
      • 1 tablespoon garlic, chopped
      • 1/2 cup soy sauce
      • 1/2 cup water
      • 3/4 cup dark brown sugar
      • vegetable oil, for frying ( about 1 cup)
      • 1 lb flank steaks
      • 1/4 cup cornstarch
      • 2 large green onions
    Directions
    1. Make the sauce by heating 2 tsp of vegetable oil in a medium saucepan over med/low heat.
    2. Don't get the oil too hot.
    3. Add ginger and garlic to the pan and quickly add the soy sauce and water before the garlic scorches.
    4. Dissolve the brown sugar in the sauce, then raise the heat to about medium and boil the sauce for 2-3 minutes or until the sauce thickens.
    5. Remove it from the heat.
    6. Slice the flank steak against the grain into 1/4" thick bite-size slices.
    7. Tilt the blade of your knife at about a forty five degree angle to the top of the steak so that you get wider cuts.
    8. Dip the steak pieces into the cornstarch to apply a very thin dusting to both sides of each piece of beef.
    9. Let the beef sit for about 10 minutes so that the cornstarch sticks.
    10. As the beef sits, heat up one cup of oil in a wok (you may also use a skillet for this step as long as the beef will be mostly covered with oil).
    11. Heat the oil over medium heat until it's nice and hot, but not smoking.
    1. Add the beef to the oil and sauté for just two minutes, or until the beef just begins to darken on the edges.
    2. You don't need a thorough cooking here since the beef is going to go back on the heat later.
    3. Stir the meat around a little so that it cooks evenly.
    4. After a couple minutes, use a large slotted spoon to take the meat out and onto paper towels, then pour the oil out of the wok or skillet.
    5. Put the pan back over the heat, dump the meat back into it and simmer for one minute.
    6. Add the sauce, cook for one minute while stirring, then add all the green onions.
    7. Cook for one more minute, then remove the beef and onions with tongs or a slotted spoon to a serving plate.
    8. Leave the excess sauce in the pan. (important)

      the sauce
      the beef in cornstarch
      the finished product; a fantastic version of mongolian beef that comes close to p.f.changs


    Saturday, March 12, 2011

    newsflash...angela's soy yummy rice bowls recipe published on soy vay website

    Hahaha...I made it big!!! LOL...Got my original "Angela's Soy Yummy Rice Bowls" recipe published on the Soy Vay website...they said it sounded YUMMY and worthy of posting on the site.  I've blogged the recipe in the past but here it is again, try it out, you won't be dissapointed.  Follow the link.

    http://www.soyvay.com/showcase/search.php?category=Chicken%20Entrees


    Angela's Soy Yummy Rice Bowls

    Submitted by Angela A.

    1 lb ground chicken or turkey
    1/2 cup Soy Vay Veri VeriTeriyaki
    1 bag frozen vegetables (you could use fresh veggies but I like to use the frozen carrot, peas, corn and green bean medley. I also add frozen broccoli).
    1 2 Tbls. chicken broth
    Sriracha (depending on how hot you like your food, squeeze accordingly)
    Steamed rice (basmati or Thai jasmine)
    1 Tbls peanut butter
    1 Tbls canola or olive oil
    1 Tbls sesame oil

    Prepare rice for 4 servings according to directions. Thaw frozen veggies , then rinse them under hot water. In an oiled non stick skillet, brown your ground chicken or turkey. Add the chicken broth and bring to a full boil (cook fully until there is no more liquid in the pan, just your nicely browned chicken). Add vegetables, cook and stir. Add 1/2 cup Soy Vay Veri VeriTeriyaki (you could do more or less). Keep stirring, add the peanut butter and Sriracha, it should be nice and saucy. Add the cooked rice and oils and stir it all up. Serves 4.

    Please visit soyvay.com for more recipes and to purchase your Soy Vay products called for in this recipe.

    Tuesday, March 8, 2011

    braised beef mushroom and chocolate stew, boo hoo but Unforgettable Pizza came through!

    Tried a new recipe tonight from the Williams-Sonoma Foods of the World Series, Barcelona, called Braised Beef with Mushrooms.  It's a rich dark flavorful beef stew, known as "Fricando" in Spain, and it's made with chocolate.  Beef, mushrooms, chocolate, how can you go wrong?  It's a slow cooker recipe, so naturally the meat is going to be super tender and delicious, right?  Doesn't it sound amazing?  Well after 5 hours of slow cooking...It SUCKED!!  Honestly, it's not even edible.  Yuck!  What did I do wrong?  I followed the recipe to a T.  The beef is super tough, I dislike the taste, what a waste, now I must go in haste.

    Here's the recipe, I don't recommend you try it.  I repeat, do not try this at home.  Why am I even giving you the damn recipe then?  Maybe it's because I typed it out while this stinkin meal was slow cooking before I had a chance to try it.  I have an entire pot of it in my fridge.  I feel very guilty throwing it down the sink so I may hang on to it and have some people over for dinner tomorrow night that I dislike (JOKING). 

    On the bright side, we ordered some damn good pizza from "Unforgettable Pizza."  It's New York style thin crust.  They are  located at 450 West 8th Ave. Vancouver, BC, off the Cambie Bridge, 604-739-7389.  I definitely recommend the pizza, it was truly unforgettable.  The Braised beef, forgettable.

    Braised Beef with Mushrooms

    Ingredients

    3 cups beef stock
    1 oz dried moixemon or mousseron or chantrelle mushrooms
    4lb beef chuck roast, sliced 2 inches thick
    salt and fresh ground pepper to taste
    1 1/4 cups all purpose flour
    1/4 cup olive oil
    2 yellow onions, sliced 1/4 inch thick
    3 garlic cloves, crushed
    1 cup dry white wine
    1/2 cup drained diced canned tomatoes
    1 oz bittersweet chocolate, chopped
    2 sprigs each fresh thyme, rosemary and oregano tied with a string

    Directions

    In a saucepan over high heat, bring stock to a boil and add mushrooms, remove from heat, cover and let stand for 1 hour.

    Season beef with salt and pepper, dredge beef in 1 cup of the flour, shake off the excess.

    In a large saute pan over medium-high heat, warm the olive oil.  Brown the beef 3 -5 minutes per side.  Transfer to a slow cooker.

    Reduce the heat to medium, add the onions and the 1/4 cup of flour to the pan and cook, stirring occasionally for 3 minutes.  Add garlic and cook for 1 minute.  Add wine, tomatoes, chocolate and herbs and bring to a simmer.  Slowly pour in the stock and mushrooms.  Simmer until thickened, 3 to 5 minutes, then add to the slow cooker.  Cover and cook on high for 4 1/2 hours.

    Remove the herb bundle and discard.  Cut the beef into chunks and serve with the sauce.  Serves 6.


    The browned beef roast


    The mushroom chocolate mixture

    Unforgettable Pizza

    Tuesday, March 1, 2011

    "leave the gun, take the cannoli"

    ....one of my favorite quotes from a movie, try to guess which one?  If your looking for a great selection of delicious authentic Italian pastries, then "Italia Bakery" is the place to go.  They make some pretty awesome ricotta filled cannoli that I absolutely LOVE! They also have the chocolate and vanilla custard filled ones too.  You can even buy the empty cannoli shells, so you can make your own filling, which is pretty simple to do.

    All you need is about 1 cup of powdered sugar, 1 1/2 teaspoon vanilla extract, 1 tsp cinnamon, some semi sweet chocolate chips (about 1/2 cup), 3 cups of ricotta cheese (make sure that you get the Scardillo Ricotta Genuina sold at your Italian deli) and a tiny bit of orange zest. Beat everything with your handmixer until smooth, put in a pastry bag and fill your shells.  Easy.

    When you don't want to go out for Italian and you don't want to slave over a stove all day, they also make some pretty delicious house made sauces.  I love their Bolognese.  This stuff is the real deal Italian mamma yummy, delicious, simply thaw and heat on the stove kinda sauce.  Better than any jarred sauces I've tasted.  I love their homemade gnocchi too, they go great together.  You can find these sauces along with homemade lasagnas, cannelloni, pastas etc in their freezer section. 

    I'm not affiliated with Italia Bakery, but I'm giving them a special shout out because they make some pretty delicious stuff.   Italia Bakery is located at 106-2828 East Hastings Street, Vancouver BC or visit them online at www.italiabakery.ca


    ricotta filled...my favorite

    chocolate and vanilla custard filled cannoli

     
    yummy bolognese made with simple ingredients